


Any paper model of a tank or a half track is very requiring and time consuming because of great number of parts for all wheels and track links. Without applying "cutting many in one go" methods the build would take even longer. For square shaped parts it's good to use knife and metal ruler to guide blade avoiding wave like edges left by scissors. Perfect, if parts are grouped together (like in this kit:) and one cut sorts few out in one go. Tracks are made out of single links connected by a pin. Usually, but not always, 2 versions of tracks are provided: single links or strips (models for experienced modelers are usually supplied with only single link version, other option seems to be waste of space). Strip version of tracks can be made pretty quickly, main difference is thickness, flexibility and construction time. Single links are very flexible (pin-joints), take easy any curves especially around the sprocket, where strip may crack or be difficult to shape up. There is however third option, which is laser cut set of tracks. It looks like simple, strip version but with all details cut out (see
Stug IV).


Single link for this model is made out of Y and U (which is reinforced with 1 mm card) shaped parts. Y part is to be folded on pins, creating loops where pin will rest, connecting links together. Horizontal edges of each link were supposed to be covered by small folds which I cut off, without even trying to use them (too much work per single link, folds are too small and any method I use does not produce good results, as any folding of such small elements causes paper to split and crease). This operation allows for an easier application of U part, as size & edges of both components are now the same.


Design of the sprocket is very simplified, or rather I would say changed from what it actually
should look like. More realistic look can be achieved with use of new methods and tools (which I might have mentioned before) - airbrush and extensive work with matt varnish to prepare and secure all card sheets (varnishing is an extremely useful, secures paper or card, prevents from splitting and makes shaping up easier and crack free, if done right). Standard build, with original colors and use of parts provided in a kit does not give much space for conversions. Further steps towards that direction will be made when I have (or rather get to it) right example to start trials on, old dusty Tiger I should be sufficient enough to serve as experimental grounds.

For each sprocket there are 12 teeth coming as 4, 1 mm thick parts, 96 in total (all remaining are no longer required). First base wheels were done and teeth fixed. Assembly of front sprocket's wheel went inside out, with the core assembled first, outer rim rolled on it, then slided into base wheel which was connected to second one completing the sprocket.


 Any paper model of a tank or a half track is very requiring and time consuming because of great number of parts for all wheels and track links. Without applying "cutting many in one go" methods the build would take even longer. For square shaped parts it's good to use knife and metal ruler to guide blade avoiding wave like edges left by scissors. Perfect, if parts are grouped together (like in this kit:) and one cut sorts few out in one go. Tracks are made out of single links connected by a pin. Usually, but not always, 2 versions of tracks are provided: single links or strips (models for experienced modelers are usually supplied with only single link version, other option seems to be waste of space). Strip version of tracks can be made pretty quickly, main difference is thickness, flexibility and construction time. Single links are very flexible (pin-joints), take easy any curves especially around the sprocket, where strip may crack or be difficult to shape up. There is however third option, which is laser cut set of tracks. It looks like simple, strip version but with all details cut out (see Stug IV).
 Single link for this model is made out of Y and U (which is reinforced with 1 mm card) shaped parts. Y part is to be folded on pins, creating loops where pin will rest, connecting links together. Horizontal edges of each link were supposed to be covered by small folds which I cut off, without even trying to use them (too much work per single link, folds are too small and any method I use does not produce good results, as any folding of such small elements causes paper to split and crease). This operation allows for an easier application of U part, as size & edges of both components are now the same.
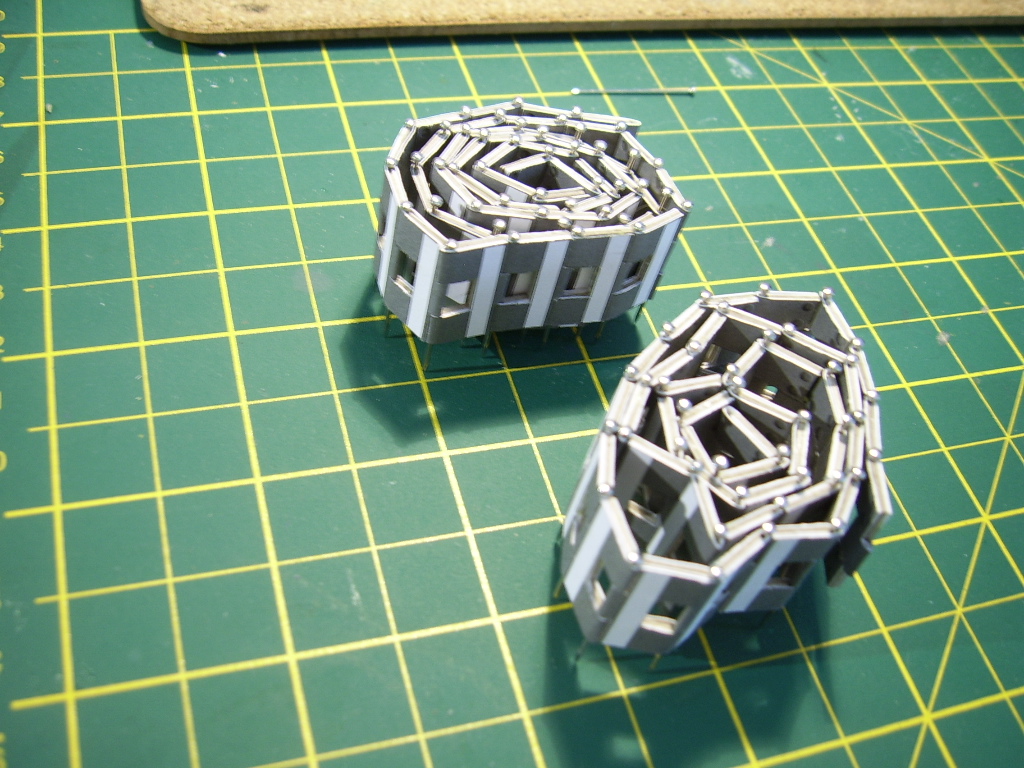


 Design of the sprocket is very simplified, or rather I would say changed from what it actually should look like. More realistic look can be achieved with use of new methods and tools (which I might have mentioned before) - airbrush and extensive work with matt varnish to prepare and secure all card sheets (varnishing is an extremely useful, secures paper or card, prevents from splitting and makes shaping up easier and crack free, if done right). Standard build, with original colors and use of parts provided in a kit does not give much space for conversions. Further steps towards that direction will be made when I have (or rather get to it) right example to start trials on, old dusty Tiger I should be sufficient enough to serve as experimental grounds.
 For each sprocket there are 12 teeth coming as 4, 1 mm thick parts, 96 in total (all remaining are no longer required). First base wheels were done and teeth fixed. Assembly of front sprocket's wheel went inside out, with the core assembled first, outer rim rolled on it, then slided into base wheel which was connected to second one completing the sprocket.
No comments:
Post a Comment